In this article, you’ll learn how to set up automated virus scanning and content verification for an Azure Blob Storage container using a simple Automated Cloud Flow in Power Automate.
Business process automation in Power Automate: No code, and no less effective
Business process automation is getting easier by the day. Cloud-based services like Power Automate make it easy to connect applications together and take complex actions on files and data without writing any code.
Among the complex actions we can take are virus scanning and content verification - two essential services for ensuring security and data integrity within automated workflows. Both actions can be handled in one step when we upload and use Cloudmersive’s Advanced Virus Scan API as a custom Power Automate connector.
Scanning and verifying Azure Blob Storage uploads with Cloudmersive in Power Automate
Using a custom Advanced Virus Scan API connector in conjunction with the Azure Blob Storage connector already available in Power Automate, we can instantly scan and verify files entering an Azure Blob Storage container through a completely codeless workflow. The custom Advanced Virus Scan API connector gives us access to the Scan an Azure Blob for viruses API path, which only requires our Azure Blob Storage connection string and container name to thoroughly investigate Blob uploads.
Uploading the Advanced Virus Scan API as a custom connector is straightforward, and the end-to-end process is demonstrated in this brief walkthrough video.
In this article, we’ll demonstrate how to set up a simple Power Automate flow which does the following:
- Triggers when new files are uploaded to an Azure Blob Storage container.
- Scans Azure Blob Storage uploads for viruses and verifies their contents.
- Returns a detailed, actionable response object back to our flow for each scanned file.
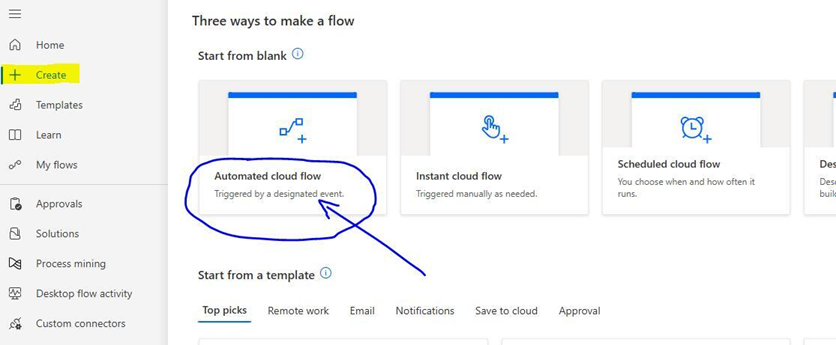
Getting Started
After we’ve uploaded our custom Advanced Virus Scan API connector and verified that it’s available in the Custom Connectors tab of our Power Automate home page, we’ll navigate to the Create tab and select the option to create an Automated cloud flow.
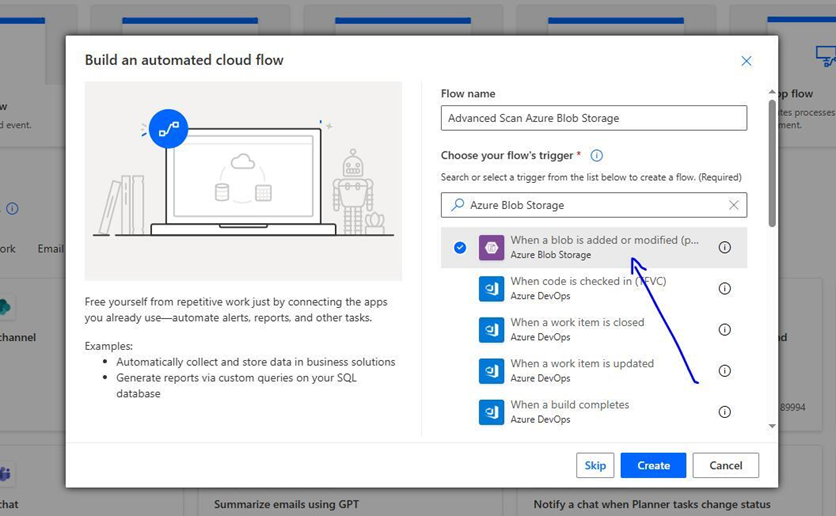
We’ll name our flow, and we’ll then search for Azure Blob Storage trigger actions. There’s only one trigger action associated with this connector, and it’s called When a blob is added or modified (properties only) (V2). After we select this action, we’ll click Create.
Configuring our Azure Blob Storage connector
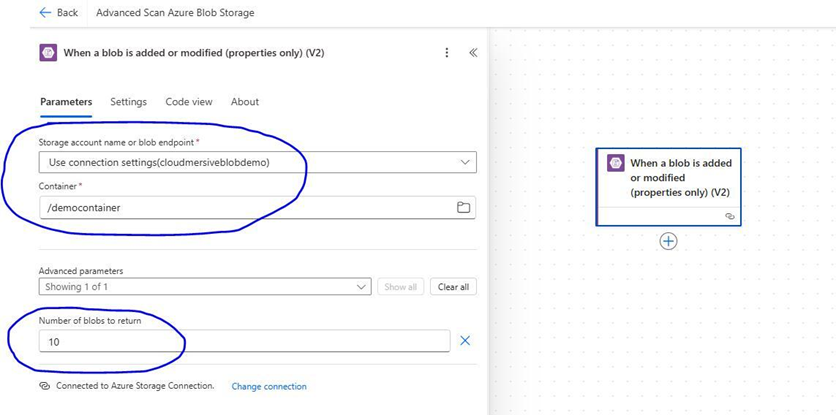
Once we’re in the flow designer, we’ll click on our trigger action and configure our Azure Blob Storage connection.
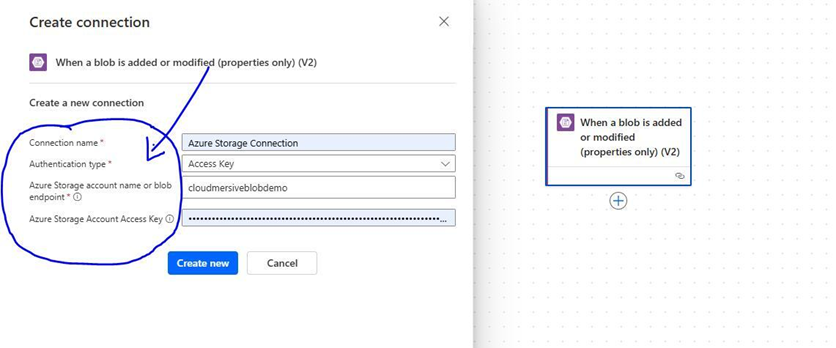
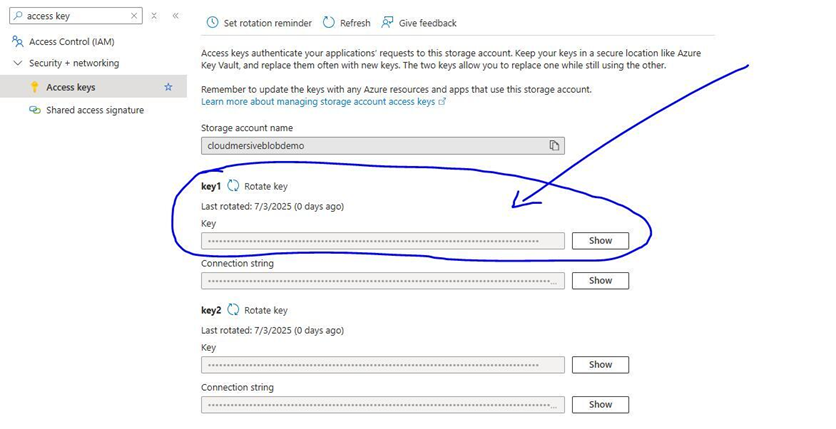
In this example, we’ve named our connection “Azure Storage Connection” and selected Access Key as our Authentication type. If we select this authentication option, we’ll also need to provide our Azure Storage account name (or blob endpoint) along with our Azure Storage Account Access Key. Our Access Key can be found in the Access Keys tab of our Azure Blob Storage account blade.
After we’ve created our connection, we’ll select our account name (or endpoint) from the initial dropdown field, and we’ll then select our Container in the following field. In the Advanced parameters, we’ll enter an integer to specify the number of blobs (files) our Azure Blob Storage Container should return when our flow is triggered.
Configuring our Cloudmersive Advanced Virus Scan API Custom Connector Action
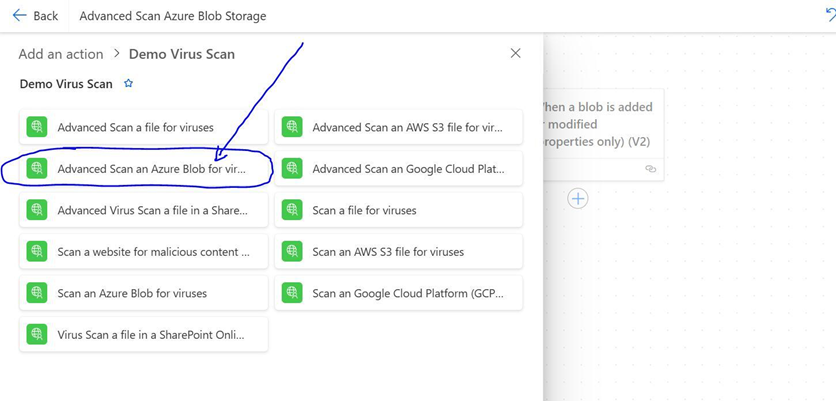
We’ll now add a new action and navigate to the Custom connector tab.
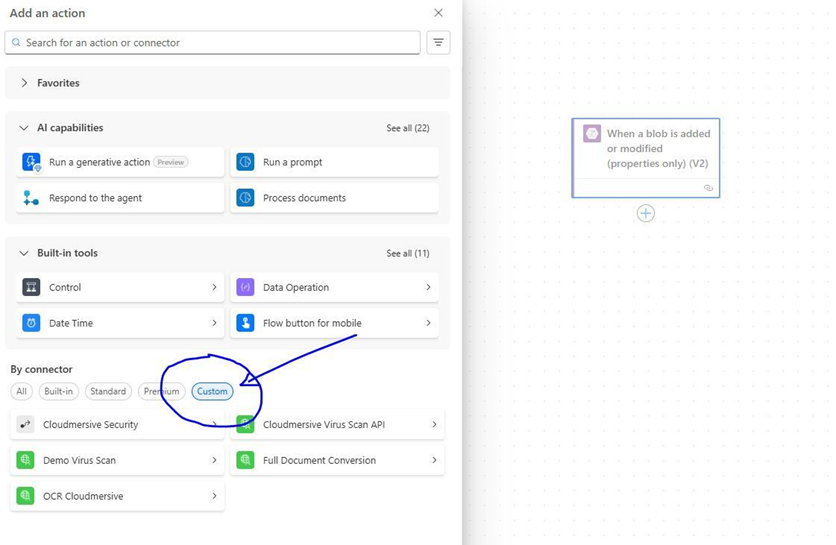
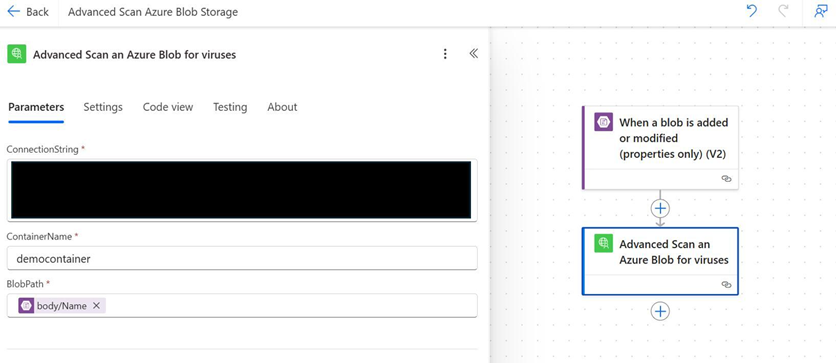
We’ll click on the custom Advanced Virus Scan API connector we created, and from this connector’s actions list, we’ll select the Advanced Scan an Azure Blob for viruses action.
This action uses our Azure Blob Storage connection string and container name to establish a connection with our storage container. It then accepts a blob path (or blob name) to scan blobs (files) for threats.
We’ll find our connection string in the Access keys tab of our Azure Storage account blade.
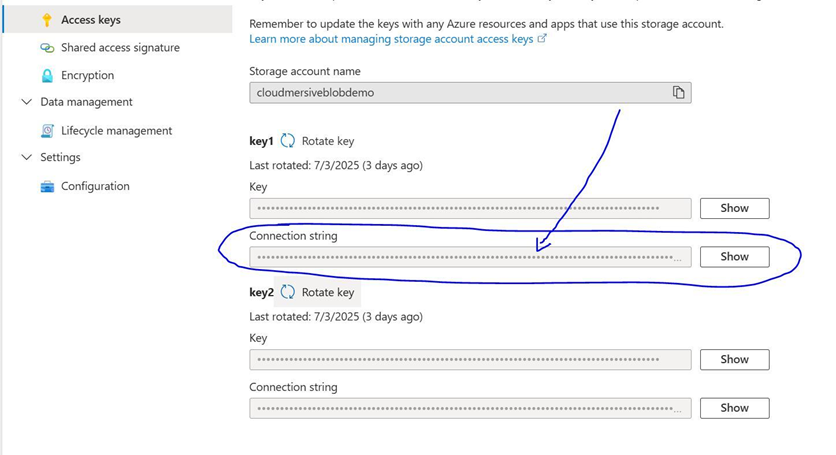
We’ll copy our connection string into the initial field of our action in Power Automate, and we’ll then provide the container name and blob name in the following fields. We’ll find the blob name available as dynamic content from our trigger action (labeled body/Name in the dynamic content window).
In the Advanced parameters, we’ll find dropdown fields for each threat rule we can customize for our Azure Blob Storage container. By default, each parameter is set to False (this is represented as No in Power Automate; True is represented as Yes).
Setting a parameter to True tells the Advanced Virus Scan API to treat that specific type of content as safe. For instance, setting AllowExecutables to Yes means the Advanced Virus Scan API will return a ”CleanResult”: true response when potentially harmful file types like .exe or .dll are detected.
The RestrictFileTypes parameter can be used to whitelist file types by extension. Supplying a list of file extensions like .pdf,.docx, .xlsx tells the API to treat any file type not included on this list as unsafe.
In this example flow, we’ll be leaving each threat rule in its default setting.
Testing our Flow
At this point, we’ve created a flow that triggers when new files are uploaded to a specific Azure Blob Storage container and scans those files for threats using Cloudmersive’s Advanced Virus Scan API. It’s important to remember that no files are ever leaving Azure Blob Storage and entering Power Automate in this flow; the Advanced Scan an Azure Blob for viruses action is retrieving and scanning files from our Azure Blob Storage container on its own using the connection string and name we provided.
To test our flow, we’ll save it and select the option to trigger it manually.
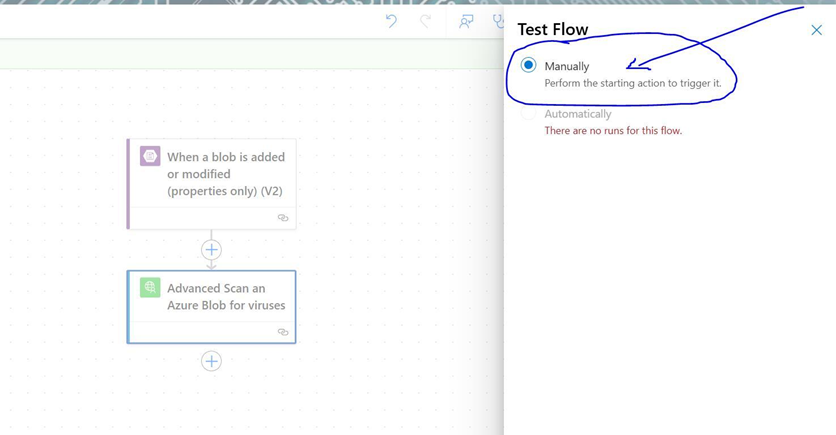
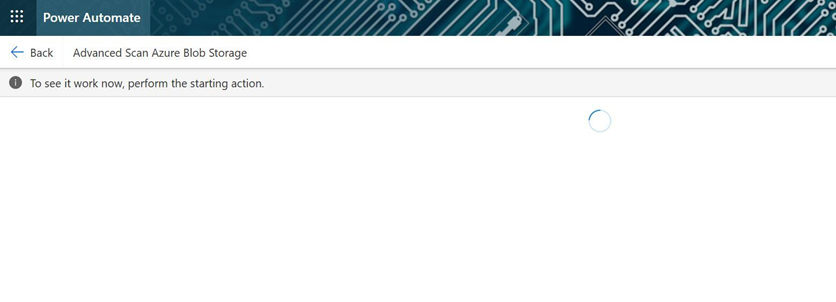
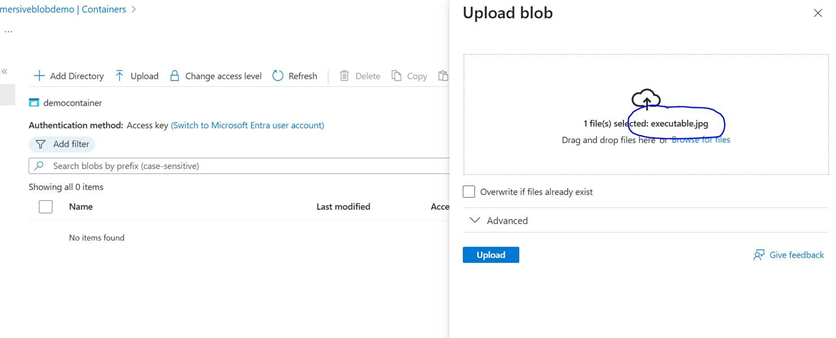
After we click Test at the bottom of that window, Power Automate will wait for us to perform the trigger action to initiate the test. That means we’ll head to our Azure Blob Storage container and upload a file.
In this example, we’ll upload a special test file. This file is an executable disguised as a .jpg image. It’s intended to simulate the type of specially crafted payload threat actors might upload to storage containers to initiate multi-stage cyberattacks.
Analyzing Test Results

After our flow notices the trigger action and runs to completion, we’ll open our Advanced Scan an Azure Blob for viruses action and click Show raw outputs to view the full API response body.
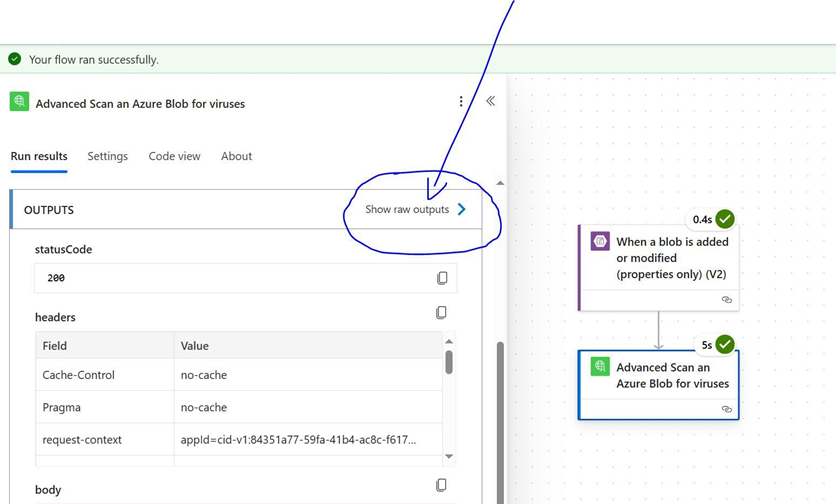
Since we tested this example flow with an unsafe file, we can use this response to understand what it looks like when threats are identified by Cloudmersive in our Azure Blob Storage container.
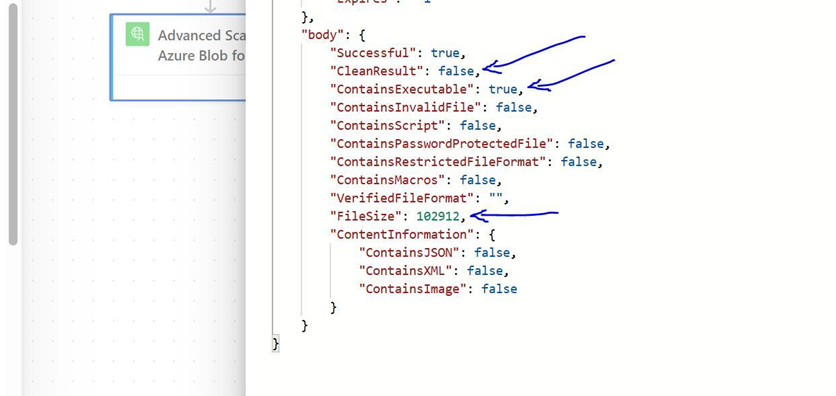
In the above response, we’ll notice that the file uploaded in this example run received a “CleanResult”: false result, indicating it’s unsafe to open. The ”ContainsExecutable”: true” result tells us exactly why the file is unsafe; it contains executable content. The “FileSize”: 102912 result indicates exactly how large the file was (in bytes).
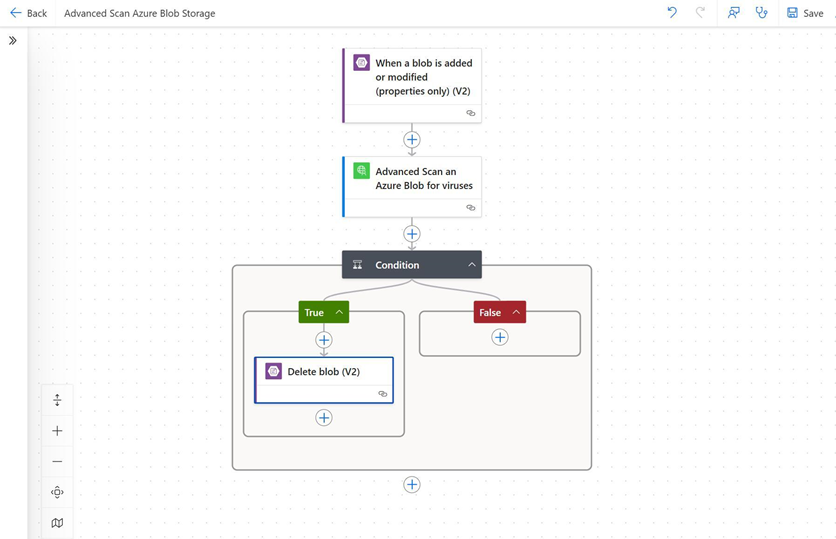
Each of these response fields can be used to invoke subsequent actions in our Power Automate flow. We could, for example, introduce a Condition which uses the Azure Blob Storage action Delete blob (v2) to remove unsafe files.
Conclusion
In this article, we learned how to use Cloudmersive’s Advanced Virus Scan API in Power Automate to scan an Azure Blob Storage container for threats. We created an Advanced Virus Scan API custom connector, and we triggered our flow using the Azure Blob Storage connector.
To learn more about leveraging Cloudmersive’s Advanced Virus Scan API in Power Automate, please do not hesitate to reach out to a member of our team.


 Technical Articles
 Virus Scan APIs
 Content Disarm and Reconstruction APIs
 Spam Detection APIs
 Document Conversion & Processing APIs
 Document AI APIs
 Natural Language Processing (NLP) APIs
 Optical Character Recognition (OCR) APIs
 Image and Face Recognition and Processing APIs