Thanks to its readability and simplicity, Python is becoming a more and more popular programming language for building web application backends. That means writing Python code to process client-side web application inputs – file uploads in particular – is becoming increasingly relevant.
It’s critical that web application file uploads are scanned for viruses and other potential threats before they’re parsed by file-processing libraries or uploaded to cloud containers for long-term storage. Otherwise, web applications, web servers, or precious data might become compromised through sophisticated file upload attacks.
Thankfully, Cloudmersive makes it straightforward to build robust security policies against viruses, malware, and specially crafted threats directly into a Python web application backend. Cloudmersive’s Advanced Virus Scan API can detect each of these threat categories simultaneously, and consuming Advanced Virus Scan API calls is made easy thanks to pre-formatted, ready-to-run Python code examples made available to Cloudmersive customers.
In this article, we’ll walk through the process of implementing Cloudmersive’s Advanced Virus Scan API into a Python application to scan files for viruses, malware, and other threats. We’ll include all the code examples we need here, so there’s no need to open the API Console (in case reviewing the API specs on that page is of interest, however, it can be accessed by following this link).
Python developers will find this process to be a straightforward and stress-free solution for their file upload threat detection concerns.
Installing the Advanced Virus Scan API SDK in Python
To install the Advanced Virus Scan API Software Development Kit (SDK) in our Integrated Development Environment (IDE), we’ll run one quick pip command in our terminal.
pip install cloudmersive-virus-api-client

Executing this command in our terminal installs all the client libraries we need to configure request authorization, create an instance of the API class, call the API instance, and print or parse our response.
Structuring our API call
We don’t need to interpret any esoteric instructions to structure a Cloudmersive API call in our Python file. We can simply copy the code examples below, paste them directly into our file, and consume API calls right away – or reconfigure our code however we need to fit the specific use-case we have in mind.
Adding the imports
We’ll start by copying the below imports and pasting them at the top of our .py file.
from __future__ import print_function
import time
import cloudmersive_virus_api_client
from cloudmersive_virus_api_client.rest import ApiException
from pprint import pprint
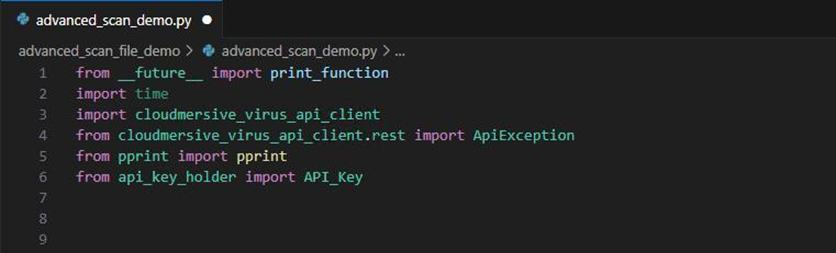
These imports bring the Cloudmersive Virus API client and a special exception library into our project. They also give us the print_function if we’re running Python 2 (we can ignore the print_function import if we’re on Python 3).
The time library is useful for rate limiting and pausing execution, and the pprint library will ensure our response object appears neat and readable in our terminal:
Implementing the remaining code
Next, we’ll copy the code block below and paste it directly into our .py file.
# Configure API key authorization: Apikey
configuration = cloudmersive_virus_api_client.Configuration()
configuration.api_key['Apikey'] = 'YOUR_API_KEY'


# create an instance of the API class
api_instance = cloudmersive_virus_api_client.ScanApi(cloudmersive_virus_api_client.ApiClient(configuration))
input_file = '/path/to/inputfile' # file | Input file to perform the operation on.
allow_executables = True # bool | Set to false to block executable files (program code) from being allowed in the input file.  Default is false (recommended). (optional)
allow_invalid_files = True # bool | Set to false to block invalid files, such as a PDF file that is not really a valid PDF file, or a Word Document that is not a valid Word Document.  Default is false (recommended). (optional)
allow_scripts = True # bool | Set to false to block script files, such as a PHP files, Python scripts, and other malicious content or security threats that can be embedded in the file.  Set to True to allow these file types.  Default is false (recommended). (optional)
allow_password_protected_files = True # bool | Set to false to block password protected and encrypted files, such as encrypted zip and rar files, and other files that seek to circumvent scanning through passwords.  Set to True to allow these file types.  Default is false (recommended). (optional)
allow_macros = True # bool | Set to false to block macros and other threats embedded in document files, such as Word, Excel and PowerPoint embedded Macros, and other files that contain embedded content threats.  Set to True to allow these file types.  Default is false (recommended). (optional)
allow_xml_external_entities = True # bool | Set to false to block XML External Entities and other threats embedded in XML files, and other files that contain embedded content threats.  Set to True to allow these file types.  Default is false (recommended). (optional)
allow_insecure_deserialization = True # bool | Set to false to block Insecure Deserialization and other threats embedded in JSON and other object serialization files, and other files that contain embedded content threats.  Set to True to allow these file types.  Default is false (recommended). (optional)
allow_html = True # bool | Set to false to block HTML input in the top level file; HTML can contain XSS, scripts, local file accesses and other threats.  Set to True to allow these file types.  Default is false (recommended) [for API keys created prior to the release of this feature default is True for backward compatability]. (optional)
restrict_file_types = 'restrict_file_types_example' # str | Specify a restricted set of file formats to allow as clean as a comma-separated list of file formats, such as .pdf,.docx,.png would allow only PDF, PNG and Word document files.  All files must pass content verification against this list of file formats, if they do not, then the result will be returned as CleanResult=false.  Set restrictFileTypes parameter to null or empty string to disable; default is disabled. (optional)

try:
    # Advanced Scan a file for viruses
    api_response = api_instance.scan_file_advanced(input_file, allow_executables=allow_executables, allow_invalid_files=allow_invalid_files, allow_scripts=allow_scripts, allow_password_protected_files=allow_password_protected_files, allow_macros=allow_macros, allow_xml_external_entities=allow_xml_external_entities, allow_insecure_deserialization=allow_insecure_deserialization, allow_html=allow_html, restrict_file_types=restrict_file_types)
    pprint(api_response)
except ApiException as e:
    print("Exception when calling ScanApi->scan_file_advanced: %s\n" % e)
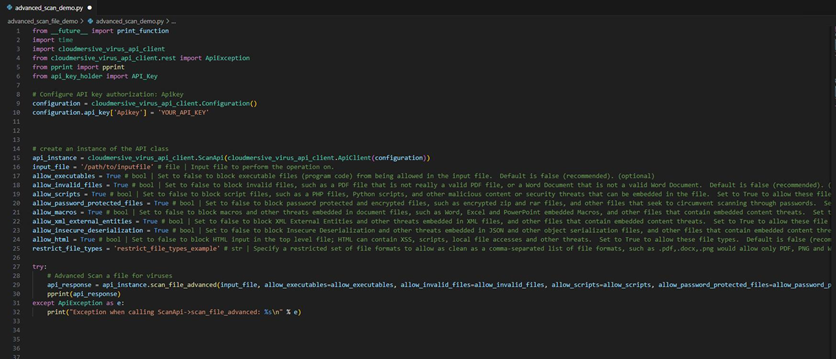
The above code is pre-formatted for our convenience, so we don’t need to change anything for it to run correctly. The code comments next to each optional threat rule variable provide a detailed explanation of how each rule should be configured.
How this API’s specially crafted threat detection policies work
The optional threat rules shown in the above examples correspond to specially crafted (or “zero-day”) threats attackers might create to carry out file upload attacks without employing documented viruses or malware.
Executables, invalid files, scripts, password protected files, macros, and others are all warning signs of specially crafted file-based attacks. This API identifies those threats using deep content verification (deterministic threat detection) policies. These policies look deep inside files to analyze what a file’s contents really are and flag whether those contents might be harmful.
For example, an attacker might upload an executable (e.g., .dll) to web server disguised as a .jpg to trick weakly configured extension-based content validation policies into believing the file is clean. Setting allow_executables to False blocks that threat deterministically because the API identifies the internal contents as executable.
Behind the scenes, this API also references a database of 17+ million threat signatures (updated every 10 minutes with fresh data) to identify known virus and malware patterns in files. When viruses and malware are detected within a file upload, they’re reported in the API response; there’s nothing we need to configure in the code for that to happen.
Configuring the authorization snippet
In the API key configuration snippet near the top of our code, we’ll replace the ‘YOUR-API-KEY-HERE’ placeholder text with an API key from our Cloudmersive Management Portal. This takes care of request authorization when we consume our API calls. In this example, we’ve chosen to store our API key in a separate class and reference the API key attribute.

If we don’t already have an API key, we can create a free-tier account to get an API key with a limit of 800 API requests per month.
Filling in the input_file parameter
The API needs a file path to grab the file we’re scanning on route to the API endpoint.
In this example API call, we’ve replaced the placeholder input_file path string with the relative path of an EICAR test file. This file path is stored on the same path as our code files to simplify testing; in our application, we should use whichever temporary storage path (or queue) our workflow accesses files from. In case we’re unfamiliar with EICAR files, they’re inert test files which can be used to safely trigger ’clean_result’: False responses in a sandbox environment.
Consuming API calls and handling the response
As currently constituted, our API call will use the pprint library within a try/except block.

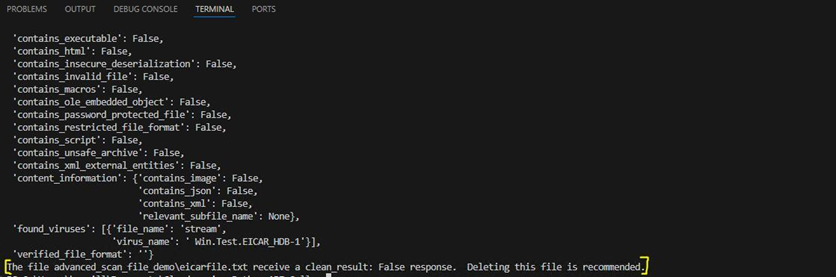
This formats the API response object neatly in our terminal when virus scan results are delivered. Here’s an example response for an EICAR file:
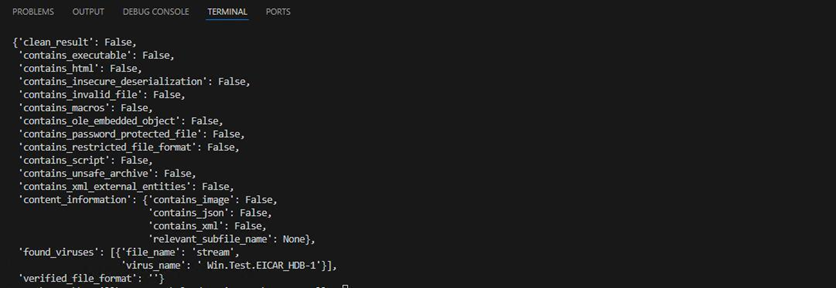
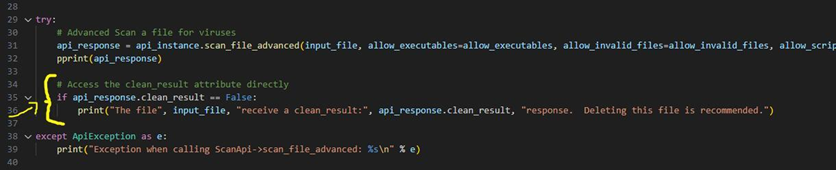
Knowing how the API response object is structured, we can alternatively reference attributes from this object directly in our code to print custom messages (or take any other actions based on the scan results).
For example, we could use the api_response.clean_result attribute to print a conditional statement only when files receive a ’clean_result’: False response.
Conclusion
Yep, that’s all there is to it! We’ve successfully implemented all the code we need to consume Cloudmersive Advanced Virus Scan API calls in our Python project. The whole process is intended to be straightforward, turn-key, and easily reusable across any of our Python web application project.
For more information on using Cloudmersive Virus Scan APIs in your Python applications, please do not hesitate to reach out to a member of our team.


 Technical Articles
 Virus Scan APIs
 Content Disarm and Reconstruction APIs
 Spam Detection APIs
 Document Conversion & Processing APIs
 Document AI APIs
 Natural Language Processing (NLP) APIs
 Optical Character Recognition (OCR) APIs
 Image and Face Recognition and Processing APIs