
|
| Extending SharePoint List Capabilities with Cloudmersive: Convert Excel Attachments to JSON in Power Automate |
| 8/28/2024 - Brian O'Neill |
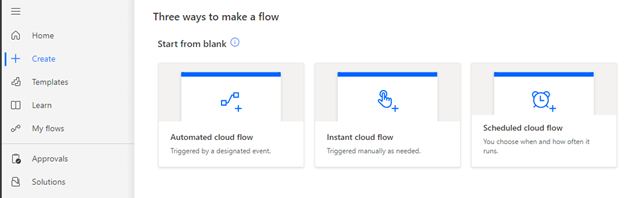
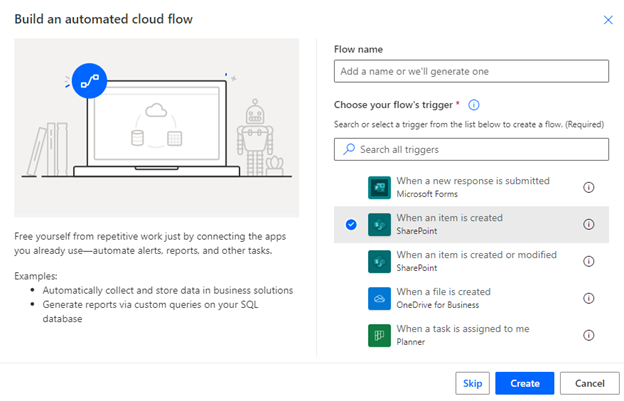
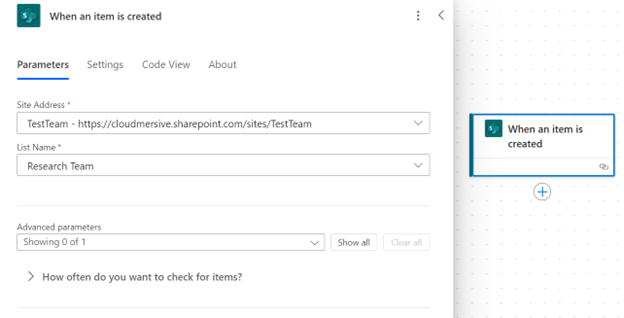
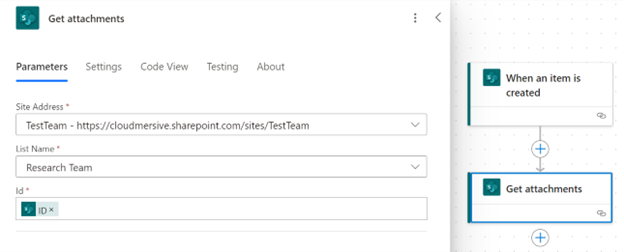
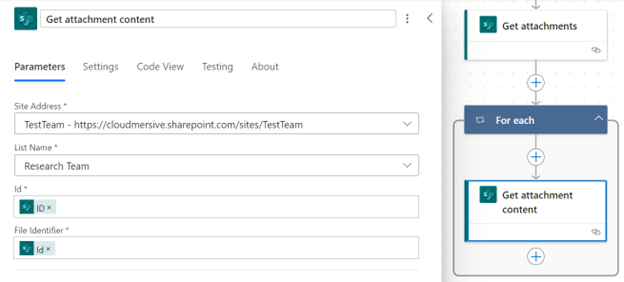
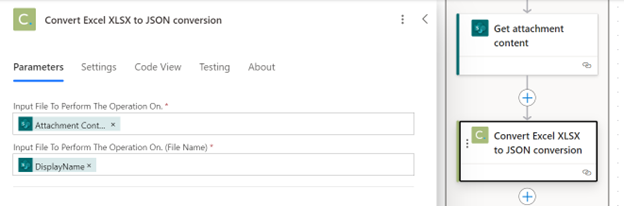
These days, JSON format reigns supreme in most programming environments. That’s true even on no-code platforms like Power Automate, which conveniently offers built-in actions for parsing JSON data from API responses into individual dynamic content items. While it’s entirely possible to parse and leverage data in other formats – like CSV or even XLSX, for example – it’s far easier to perform dynamic data-related actions in Power Automate when we re-structure our data a JSON objects. In this installment of our SharePoint List Automation blog series, we’ll learn how to take full advantage of SharePoint Lists that gather standardized Excel spreadsheet attachments from team members. We’ll create a simple Power Automate flow that automatically converts our Excel list attachments to JSON objects in Power Automate, and we’ll use the Cloudmersive Convert API to handle our conversion. What Can we Do with Excel Data Converted to JSON?First and foremost, it's worth noting that we'll benefit significantly from converting Excel data to JSON in workflows designed to pass data to external web services. Most (if not all) web services want to consume simple JSON objects rather than complex file structures like XLSX, and that’s especially true when we’re dealing with cross-platform data exchange. If, for example, we're creating extremely advanced flows that send Excel datasets to NoSQL databases or share Excel information with external API endpoints via HTTP, we'll definitely want to use JSON. On a much less complex & more practical level, we’ll find JSON data dramatically simpler to use in most of our simple data transformation and automation workflows. Once we’ve converted spreadsheet data to JSON, we can parse that data into a custom schema, and we can use each individual item from that schema downstream in our flow. For example, we could automatically parse items from expense report spreadsheets and share those items in approval workflows involving important list stakeholders. In this example, we directly extend the utility of our SharePoint List and shave time off a critical business process without writing any code. Converting Excel to JSON with the Cloudmersive Convert APIWhen it comes time to make our Excel to JSON conversion in this walkthrough, we’ll be using an iteration of the Cloudmersive Convert API labeled Convert Excel XLSX to JSON conversion. If you’ve followed other walkthroughs in our SharePoint List automation blog series, you’ll know we’ve talked ad nauseum about the two primary options available to take advantage of Cloudmersive APIs in Power Automate. We’ll go over that again now. The two options we have are 1) taking advantage of a the Cloudmersive Document Conversion connector, which is published in the Power Automate connector database and uses a public cloud endpoint by default, and 2) uploading the Cloudmersive Convert API to Power Automate as a custom connector, which allows us to set our own private or managed instance endpoint. If we’re a private or managed instance customer, we can contact our sales representative if we’re curious to learn more about setting up Cloudmersive APIs as custom connectors in Power Automate. The upload process is nice and straightforward; the API spec can be parsed via Power Automate’s OpenAPI URL option. If we’re new to using Cloudmersive connectors, we can set up a free account to use the Document Conversion connector with a free API key. It’s important to note that we’ll need a premium Power Automate account to access Cloudmersive connectors, but with our free Cloudmersive API key, we’ll be able to make up to 800 API calls per month in perpetuity with zero additional commitments (our call total will reset each month). In this walkthrough, we’ll be using the published Cloudmersive Document Conversion connector in our example flow. This makes setting up the demonstration easier. Step 1: Select the Automated Cloud Flow OptionWe’ll start off this flow with the same initial steps we’ve used in previous SharePoint List automation walkthroughs. We’ll first select the option to create an Automated cloud flow. And right after that, we’ll search for and select the SharePoint When an item is created trigger action. To be clear, this action will only trigger our flow when new items are added to our target list. If we want to trigger our flow when items are updated as well, we can use the When an item is created or modified trigger action instead. Keep in mind, however, that using this option will trigger an infinite loop error if we use our flow to update the original list item. Step 2: Configure the Site Address and List NameWhen we reach the flow diagram page, the first thing we’ll do is configure our trigger action. That means opening up our trigger action and selecting our SharePoint Site Address and List name from each respective dropdown. As a quick reminder, we’ll need to select these same two values for each subsequent SharePoint action in our flow. Step 3: Get Excel Attachments and Attachment ContentsNow that our flow is primed to grab information from our target SharePoint List when new items are created, we can obtain information about Excel files attached to the trigger item, and we can get the file bytes we need for our JSON conversion directly after that. We’ll first add a SharePoint action called Get attachments into our flow. After we configure our list details, we’ll use add the list item ID (displayed as ID in the dynamic content window) from our trigger step into the Id parameter. Next, we’ll add a SharePoint action called Get attachment content. For this action, we’ll use both the list item ID from our trigger step and the file identifier ID from our Get attachments step to pull Excel file bytes into our flow. We’ll notice that Power Automate automatically wraps the Get attachment content action in an Apply to each (displayed in-flow as For each) control to account for the possibility that multiple documents were attached to our triggering list item. If multiple Excel files are attached to an item in our target list, this portion of the flow will perform our conversion action for each separate attachment. Step 4: Convert Excel Files Bytes to JSONWithin our For each control, we’ll add a new action and search for Cloudmersive connectors. As mentioned earlier, we’re looking for the published Cloudmersive Document Conversion connector in this example (if we were using the Convert API as a custom connector, we would select the Custom value from the Runtime dropdown instead). Once we find this this connector, we can click See more to view the actions list. From here, we’ll use a control find search to locate the action labeled Convert Excel XLSX to JSON conversion. When we find the correct action, we’ll select it, and we’ll then configure our connection by adding our API key if we haven’t used this connector before. If we’re using a custom connector, our connection should’ve been configured during the OpenAPI upload process. To configure our request, we’ll select Attachment Content from the Get attachment content step to satisfy our Input File parameter, and we’ll use the DisplayName value from our Get attachments step to satisfy our File Name parameter.
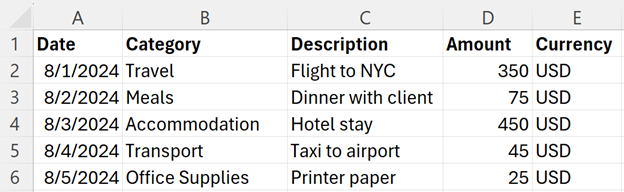
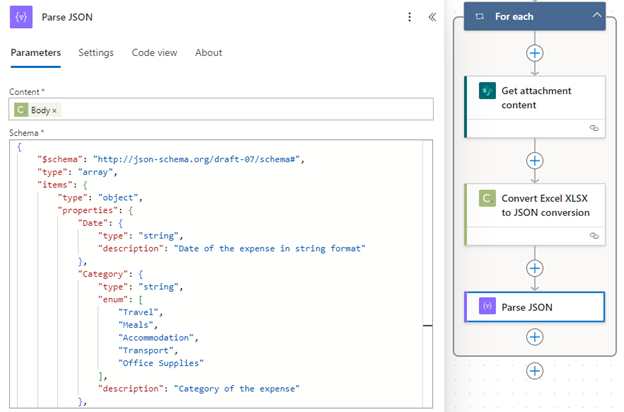
Step 5: Parse JSONUsing the Parse JSON action in Power Automate, we can pass the JSON array from our Convert Excel XSLX to JSON action into a custom schema. This schema allows us to use each field of our original Excel spreadsheet as dynamic content downstream in our flow. If, for example, our Excel list attachment contained basic expense report information like the following example: We would end up with a JSON array structured like the below example: And we could parse that array into a schema like the below example: All told, this would appear in our flow like the below screenshot: We could, for example, use our parsed JSON information to create approvals for each individual item on the expense report. Thanks to our For each control, adding a single approval action would send multiple separate approvals to stakeholders for each individual item in the original spreadsheet. We could then implement a feedback loop that shared approval information directly with the employee who originally attached the spreadsheet to the SharePoint List. This is just one example of how we can leverage our converted Excel data in a simple flow. Once we’ve converted Excel data to JSON, the possibilities are endless! ConclusionIn this walkthrough, we’ve learned how to leverage the Cloudmersive Convert API in Power Automate to automatically convert Excel attachments to JSON when they’re added to a specific SharePoint List. If you have any questions about using Cloudmersive APIs in your Power Automate flows, please feel free to reach out to a sales representative – they’ll be happy to answer any questions you may have and help create POC’s as needed. |
Sign Up Now or 

 Blog
Blog


 Virus Scan APIs
 Content Disarm and Reconstruction APIs
 Spam Detection APIs
 Document Conversion & Processing APIs
 Document AI APIs
 Natural Language Processing (NLP) APIs
 Optical Character Recognition (OCR) APIs
 Image and Face Recognition and Processing APIs