When we learn about data leaks in the news, the story we read is normally about hackers breaking into enterprise networks and extracting user information. In such cases, customer names, emails, phone numbers, social security numbers (SSNs), health insurance numbers (HINs), and myriad additional data types become the property of some unknown, untrusted entity, and dread builds for those affected as follow-up attacks on the customers themselves seem inevitable.
Network breaches might steal headlines, but they’re far from the only reason data leaks happen. Data leaks frequently follow a much more mundane path, beginning with judgement errors from internal employees/executives and ending with compliance violations and massive reputation loss for the company brand.
Thankfully, however, it doesn’t take quite as much heavy lifting to prevent internal data leaks as it does to defend a whole enterprise network against unpredictable attackers. We can simply implement a reliable Data Loss Prevention (DLP) solution and ask it to redact targeted instances of data leaks before that data leaves our applications/network.
That’s exactly how Cloudmersive DLP works. Like all Cloudmersive APIs, the DLP API is simple to implement, easy to use, and built to scale with enterprises of all shapes and sizes. It allows for custom detection by data type to accommodate a variety of different workflows, and it replaces leaked data with asterisks to eliminate the risk of compliance violations without severing communication entirely as a result.
In this article, we’ll walk through an example DLP API call using Python code examples taken directly from our Swagger page (you can find these examples here). Using Google Colab as our environment (Python 3), we’ll redact PII from an example text input, and we’ll show what the redacted text looks like when we get our API response back.
As a quick note, we’ll need a Cloudmersive API key to follow along with this walkthrough, and we can get one by creating a free account on the Cloudmersive website. That’ll give us a limit of 800 API calls per month with zero commitments, so we can see this API in action on a limited scale.
Installing the SDK
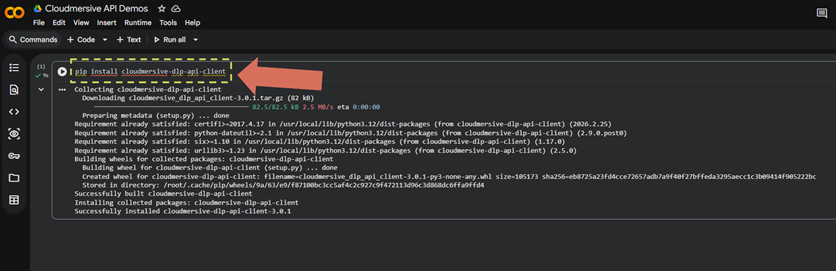
To get started, we’ll first install the DLP SDK. We can take care of that quickly with the below pip command:
pip install cloudmersive-dlp-api-client
Importing Resources
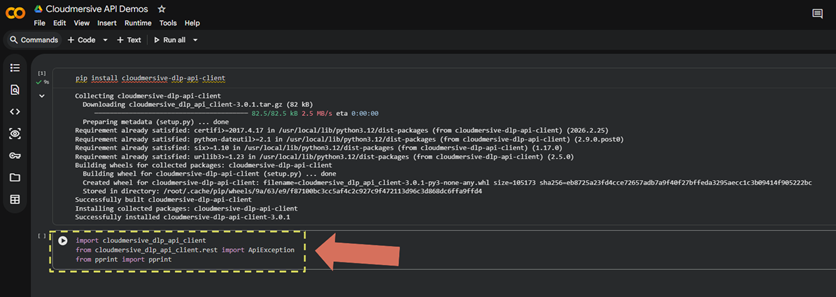
We’ll now import the required resources for our API request:
import cloudmersive_dlp_api_client
from cloudmersive_dlp_api_client.rest import ApiException
from pprint import pprint
Note that pprint is unnecessary if we’re only planning to parse information from our response. We’re incorporating this into our walkthrough because we plan to print the full response body, which is a bit lengthy.
Structuring our Request
We can now build our API request with DLP API resources. The easiest way to do that is to begin with example code found on the DLP API Swagger page. We can also copy that same code below:
# Configure API key authorization: Apikey
configuration = cloudmersive_dlp_api_client.Configuration()
configuration.api_key['Apikey'] = 'YOUR_API_KEY'


# create an instance of the API class
api_instance = cloudmersive_dlp_api_client.RedactApi(cloudmersive_dlp_api_client.ApiClient(configuration))
body = cloudmersive_dlp_api_client.DlpAdvancedRedactionRequest() # DlpAdvancedRedactionRequest | Input request (optional)

try:
    # Redact User Data in Input Text (Advanced)
    api_response = api_instance.redact_text_advanced(body=body)
    pprint(api_response)
except ApiException as e:
    print("Exception when calling RedactApi->redact_text_advanced: %s\n" % e)

We’ll notice some important information is missing from this request. This most obviously includes our API key, which replaces ’YOUR_API_KEY’ in the configuration.api_key[‘Apikey’] snippet, but it also includes our request body.
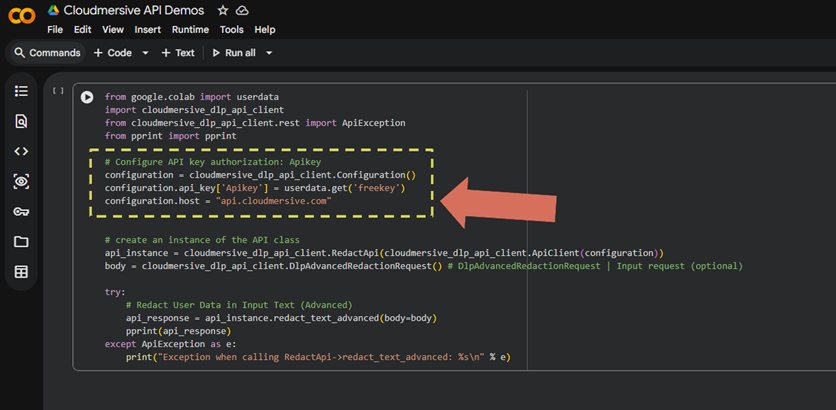
First, we’ll configure our API key and host by setting the configuration.api_key[‘Apikey’] and configuration.host attributes.
configuration = cloudmersive_dlp_api_client.Configuration()
configuration.api_key['Apikey'] = userdata.get('freekey')
configuration.host = "api.cloudmersive.com"
But how do we configure our body variable to reflect our custom DLP request?
The answer is simple: we follow the below API request model JSON found on the Swagger page.
{
  "InputText": "Hello, world!",
  "AllowEmailAddress": false,
  "AllowPhoneNumber": false,
  "AllowStreetAddress": false,
  "AllowPersonName": false,
  "AllowBirthDate": false,
  "AllowPassportNumber": false,
  "AllowDriversLicense": false,
  "AllowSocialSecurityNumber": false,
  "AllowTaxpayerID": false,
  "AllowCreditCardNumber": false,
  "AllowCreditCardExpirationDate": false,
  "AllowCreditCardVerificationCode": false,
  "AllowBankAccountNumber": false,
  "AllowIBAN": false,
  "AllowHealthInsuranceNumber": false,
  "AllowBearerToken": false,
  "AllowHttpCookie": false,
  "AllowPrivateKeys": false,
  "AllowCredentials": false,
  "AllowDeepWebUrls": false,
  "AllowSourceCode": false,
  "AllowIpAddress": false,
  "AllowMacAddress": false,
  "AllowHealthInsuranceMemberID": false,
  "AllowHealthInjuryOrDisease": false,
  "AllowHealthTypeOfTreatment": false,
  "AllowHealthDateAndTimeOfTreatment": false,
  "AllowHealthPlanBeneficiaryNumber": false,
  "AllowHealthPaymentsMadeForTreatment": false,
  "AllowVehicleID": false,
  "AllowDeviceID": false,
  "AllowNamesOfRelatives": false,
  "AllowHealthUniversalRecordLocator": false,
  "AllowBiometrics": false,
  "RedactionMode": "ReplaceWithAsterisk",
  "ProvideAnalysisRationale": true,
  "CustomPolicyID": ""
}
In our example, we’ll leave all the custom flags from the request model at their default values. That means we don’t need to specify values for any of those attributes in our request.
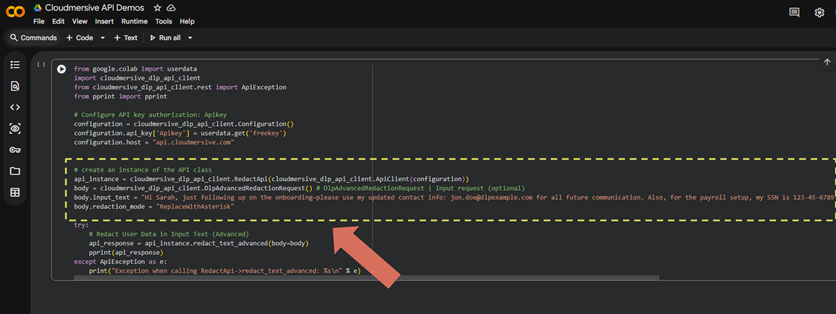
We’ll just set our input text and specify ”ReplaceWithAsterisk” as our redaction mode setting. The input text we’ll use in this case will be an egregious data leak containing an email address, a social security number, and a bank account number.
Here’s the input text we’ll use:
"Hi Sarah, just following up on the onboarding—please use my updated contact info: jon.doe@dlpexample.com for all future communication. Also, for the payroll setup, my SSN is 123-45-6789 and my bank account number is 9876543210. Let me know once everything has been updated on your end."
And here’s that text implemented in our example:
from google.colab import userdata
import cloudmersive_dlp_api_client
from cloudmersive_dlp_api_client.rest import ApiException
from pprint import pprint

# Configure API key authorization: Apikey
configuration = cloudmersive_dlp_api_client.Configuration()
configuration.api_key['Apikey'] = userdata.get('freekey')
configuration.host = "api.cloudmersive.com"


# create an instance of the API class
api_instance = cloudmersive_dlp_api_client.RedactApi(cloudmersive_dlp_api_client.ApiClient(configuration))
body = cloudmersive_dlp_api_client.DlpAdvancedRedactionRequest() # DlpAdvancedRedactionRequest | Input request (optional)
body.input_text = "Hi Sarah, just following up on the onboarding—please use my updated contact info: jon.doe@dlpexample.com for all future communication. Also, for the payroll setup, my SSN is 123-45-6789 and my bank account number is 9876543210. Let me know once everything has been updated on your end."
body.redaction_mode = "ReplaceWithAsterisk"

try:
    # Redact User Data in Input Text (Advanced)
    api_response = api_instance.redact_text_advanced(body=body)
    pprint(api_response)
except ApiException as e:
    print("Exception when calling RedactApi->redact_text_advanced: %s\n" % e)
Now we’ll run our code and look at our API response.
Interpreting our Response
After a few seconds, we’ll get a response that looks like this:
{'analysis_rationale': None,
 'clean_result': False,
 'contains_bank_account_number': True,
 'contains_bearer_token': False,
 'contains_biometrics': False,
 'contains_birth_date': False,
 'contains_credentials': False,
 'contains_credit_card_expiration_date': False,
 'contains_credit_card_number': False,
 'contains_credit_card_verification_code': False,
 'contains_deep_web_urls': False,
 'contains_device_id': False,
 'contains_drivers_license': False,
 'contains_email_address': True,
 'contains_health_date_and_time_of_treatment': False,
 'contains_health_injury_or_disease': False,
 'contains_health_insurance_member_id': False,
 'contains_health_insurance_number': False,
 'contains_health_payments_made_for_treatment': False,
 'contains_health_plan_beneficiary_number': False,
 'contains_health_type_of_treatment': False,
 'contains_health_universal_record_locator': False,
 'contains_http_cookie': False,
 'contains_iban': False,
 'contains_ip_address': False,
 'contains_mac_address': False,
 'contains_names_of_relatives': False,
 'contains_passport_number': False,
 'contains_person_name': True,
 'contains_phone_number': False,
 'contains_private_keys': False,
 'contains_social_security_number': True,
 'contains_source_code': False,
 'contains_street_address': False,
 'contains_taxpayer_id': False,
 'contains_vehicle_id': False,
 'redacted_text': 'Hi *****, just following up on the onboarding—please use my '
                  'updated contact info: ************@dlpexample.com for all '
                  'future communication. Also, for the payroll setup, my SSN '
                  'is ************* and my bank account number is '
                  '************. Let me know once everything has been updated '
                  'on your end.'}
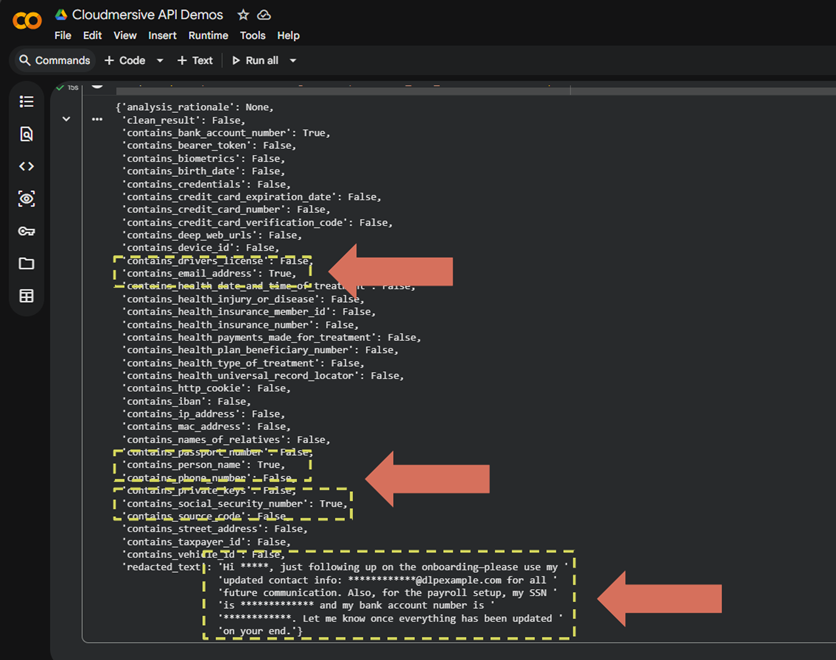
We’ll notice that only the relevant flags were tripped based on our input text. Specifically, those include:
'contains_email_address': True,
'contains_person_name': True,
'contains_social_security_number': True
At the very bottom, we’ll also notice our input text has been fully redacted with asterisks.
'Hi *****, just following up on the onboarding—please use my '
                  'updated contact info: ************@dlpexample.com for all '
                  'future communication. Also, for the payroll setup, my SSN '
                  'is ************* and my bank account number is '
                  '************. Let me know once everything has been updated '
                  'on your end.'
We now have a sanitized version of our original input which is safe to share with the intended recipient.
Conclusion
The Cloudmersive DLP API makes it easy to detect and redact data leaks in text input with custom flags. All we did was copy and paste a few lines of code, and we ended up with robust DLP capabilities we can slot directly into our Python apps. Allowing data leaks to progress past our validation steps puts our application – and our organization – at considerable risk of compliance violation.
For expert advice on using Cloudmersive DLP in your application architecture, feel free to contact a member of our team.


 Technical Articles
 Virus Scan APIs
 Content Disarm and Reconstruction APIs
 Spam Detection APIs
 Document Conversion & Processing APIs
 Document AI APIs
 Natural Language Processing (NLP) APIs
 Optical Character Recognition (OCR) APIs
 Image and Face Recognition and Processing APIs